Wimples for the Win

We had a blast despite the searing sun at the North Sound Sergeantry Trials and Sable Rose Tournament. So much fun that we utterly failed to take any pictures. Here are some pictures of me in my new garb after the fact.

IMG_4134IMG_4137IMG_4133

I finished the last of the eight long flat-felled seams in the car on the way to the event.

IMG_4140

We made it our goal while there to meet new people, since playing in the SCA is much more fun with friends than without, and we made several new friends from all three baronies present.

We also enjoyed playing with our new equipment at the thrown weapons range and archery range (a hatchet for my lord and a recurve bow for me!). Going forward, I plan to practice more regularly with my bow to better my form and thus not require basic instruction every single time I attend an event.

IMG_4139

My wimple was a complete success. Not only did it stay on my head through dancing, archery, and much walking, but it provided useful protection from the sun. My lord is still red about the face and neck thanks to my sieve of a brain (which resulted in a lack of necessaries such as sunscreen and matches–though forgetting matches is a great strategy if you want to force yourself to meet new people).

The only downside to my wimple is the fillet, which proved to be rather itchy. Since this one is made of acrylic yarn anyway, I shall feel no sorrow in speedily replacing it with a linen or silk fillet.

I am so sold on wimples. Mine was comfortable, practical, simple enough to put on without a mirror, never got in the way, and never stabbed anyone with its pins. Besides all that, it looks awesome.

Wimples for the win.

Happy Yarning!

Now for the Prettying

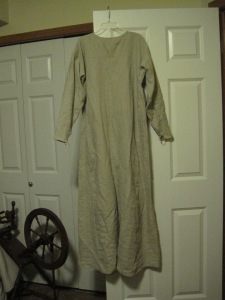
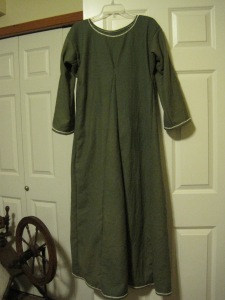
My linen underdress is finished, and my wool overdress is all put together and hemmed!

IMG_4084 IMG_4087

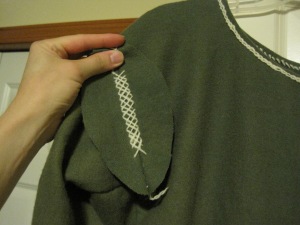
Now for the part where I spend a few weeks on embellishments. I thought the hems, chain-stitched in white wool thread, took a long time, but I have evil plans to finish some of the long seams with Mammen cushion stitch. Here’s my practice scrap.

IMG_4092

I tend to take a rather liberal view of what is historically accurate to a given place and time. For instance, I’m okay with using a stitch found on a tenth-century Viking pillow for my tenth-century Anglo-Saxon dress. As a crafty person, I’m prone to trying to recreate pretty things I see, so I figure Anglo-Saxon women wouldn’t have hesitated to try out stitches they saw their neighbors wearing. Unless they were busy running for their lives at the time. Silly Vikings.

See what I mean? Rather liberal.

In addition to these seam treatments, I’ll (hopefully) eventually add tablet-woven bands or silk onto the the cuffs, neckline, and possibly hem of my overdress.

Pretty. Pretty. Pretty…time-consuming! But at the end I’ll have my first “period” garb.

Happy Yarning.

Adventures With Linen: Why Buy Thread?

I’ve been wanting to sew some medieval garb using period materials for a long time, and I’m finally doing it!

I haven’t quite nailed down my persona yet, but I’m thinking Christian Anglo-Saxon. Between AD 800 and AD 1066?

Anyway, I forked out the cash for 100% linen and 100% wool cloth. Then I went looking for linen and wool thread. Not to be found at my fabric store. I supposed I’d have to order some online.

But of course yesterday I really wanted to begin making the underdress, and I had yet to order any thread. That’s when I remembered I’d just spent all that money on linen. I had linen.

Luckily I also happened to have a drop spindle and some wax on hand…

So now I’m making my own thread.

First I take pairs of long threads from the leftover fabric.

IMG_4056

Then I give them a bit of twist on my drop spindle.

IMG_4060

(Ok, ok, it’s a tahkli. But it’s like a drop spindle.)

Then I run them across a piece of wax.

IMG_4062

Et voila! “Free” linen thread.

IMG_4065

So far I’ve hand sewn the shoulder seams and one sleeve + gusset, and the thread hasn’t broken on me. I call this a success.

When I get to the point where I need wool thread for the overdress, I think I’ll spin it from some roving I have lying around, and then dye it with the same dye I’m using on the wool cloth.

Happy Yarning!

Lucet: Turning String into Better String

IMG_3314

The other night, my husband decided to sew a pouch for his golden dollar coins, and I volunteered to lucet a drawstring for him.

Lucet is a simple, old technique–dating back to the Vikings at least–for making braided cord. I learned it from some of my medievalist friends in college.

All you need is a lucet. (If you’re patient, you can even do it on two of your fingers.) My handy husband made this lucet for me.

IMG_3296

I usually use #10 crochet cotton, but you can use any string or yarn. You start from the bottom and make a figure-eight around the prongs, then the beginning of a second figure-eight.

IMG_3298

Next, you bring the lower string up over the prong and let it go. Cinch the whole thing up carefully. Finish your figure-eight, going around the other prong, and pull the lower string up over the other prong. Cinch again.

IMG_3299

If you keep doing that, you get cord!

IMG_3300

Having grown up with a Strickliesel (Knitting Nancy), I find it easier to use this thing, instead of my fingers, to draw the loops up and over the prongs.

IMG_3302

It makes nifty square cord, good for laces, drawstrings, necklaces, and what-have-you.

IMG_3309

I realize this isn’t a thorough tutorial. If you want to learn more, just go Google “lucet.” Even better, find someone with a lucet in your local branch of the SCA. She (or he) would love to teach you.

Happy yarning!

IMG_3304